Welcome to Foldscope’s online user guide! Use the links listed below to jump to a specific section on this page.
Welcome to Foldscope’s online user guide! Use the links listed below to jump to a specific section on this page.
Foldscope is a microscope with the following metrics:
Magnification: 140X
Resolution: ~2 micron
Back focal length: ~0.5 mm
Depth of field: ~0.01 mm
Field of view: ~0.5 mm (diagonal radius)
Foldscope is composed of paper components, magnetic components, and a lens.
The paper components are composed of a synthetic material, which functions to be waterproof, tear-resistant, and inexpensive.
The magnetic components function to help align/properly space the optic components, and to easily attach devices for phone viewing and projection.
The lens is a borosilicate glass ball embedded in a circular black plastic piece.
A microscope consists of three essential components: a sample, a lens, and a light source. The sample, or specimen, is what you're looking at in your microscope. The lens is what magnifies the sample-- it makes it look larger by bending the light you see.
Resolutionis a measure of how clearly you can see things in a microscope. The resolution of a lens is the size of the smallest feature you can distinguish when looking through it. Foldscope’s resolution is 2 microns, which is about the length of an E. coli bacterium. One micron is 0.0001 cm.
Most microscopes you might use in a classroom or laboratory are compound light microscopes. This means that their lenses are made of multiple pieces of curved glass, each piece similar to an eyeglass lens. In Foldscopes, our lens is a single glass ball. This is the same type of lens used in the very first microscope made by Antony van Leeuwenhoek in the 1600s!
In Foldscope, as in most microscopes, it’s easiest to view a sample when it’s mounted on a slide, a flat rectangle that holds your specimen. Slides provide a stiff base for the sample and keep it secure for viewing. Slides are traditionally made of glass, but Foldscope can also be used with slides made of paper.
A light source is important for illuminating the sample. In transmissive light microscopy, the light shines through the sample. This is the type of microscopy that Foldscope uses: the sample is in between the light source and the lens. Transmissive light microscopy is very effective for viewing samples that are thin and translucent, as the sample is only visible if it allows light through to the lens.
Every microscope has a set focal length: the distance at which something viewed through the lens looks clear and crisp, not blurry. In a standard 140x Foldscope lens, the back focal length is 0.56 millimeters, about the thickness of 5 sheets of paper. This means that a Foldscope sample must be only 0.56 millimeters away from the lens to be viewed clearly-- so close it’s almost touching! This flatness is one reason Jim and Manu thought that paper would be a good material for building a microscope with this lens. When you focus a microscope, you move the sample farther or nearer to the lens until it is the right distance away. A sample that is out of focus will appear blurry.
Depth of fieldis the thickness of your sample that appears in focus at the focal length. When you adjust the focus, the depth of field is like a three-dimensional window that moves forward and backward through the sample, and everything within the window’s thickness appears clear. Foldscope’s depth of field is 13.6 microns, which is 0.0136 millimeters.
Think about making a circle with your hand and looking through it with one eye-- you will only be able to see a small circle, but moving your head will let you see different things in that circle! This circle is called your field of view. Just like looking through your curled hand, all microscopes have a limited field of view: the lens allows you to see only a small area of any sample at one time. Moving your field of view is called panning. For a microscope, that means moving the sample relative to the lens, placing different areas of the sample beneath the lens.
Foldscope has 3 possible viewing methods: eye, phone, and projection. View a video tutorial of Foldscope’s viewing methods.
To view a sample directly with your eye, hold the Foldscope with the blue side facing you and bring the lens to the eye.
While you view, point the back of the Foldscope toward a light source, such as a lamp or clear sky (but do not look directly towards the sun!)
Adjust the focus by nudging the focus ramp left/right with your thumb until the image appears clear, and pan to look at other areas of the sample by using your thumbs to shift around the lens stage.
You can use a phone camera as usual to record photos, videos, and zoom further into a sample.
To view a sample with a phone, attach a coupler over the lens of your phone camera. (Make sure to place the coupler with the silver magnet side DOWN, facing the phone.)
Your phone camera lens should be centered in the hole of the ring magnet.
You can attach the coupler to the phone by using a double-sided ring sticker or with any other tape.
Once the coupler is attached, bring your phone’s camera up to the Foldscope’s lens.
Your phone should magnetically snap into place! If it does not, the coupler you attached to your phone is facing the wrong direction. Try flipping the coupler over and reattach it.
While you view, point the back of the Foldscope toward a light source, such as a lamp or clear sky (but do not look directly towards the sun!)
Foldscope’s lens has a magnification of 140x, and that magnification is multiplied by the zoom on your phone. This means that if your phone camera has more than 7x zoom, you can view samples at over 1000x magnification!
If you have an LED light module, you can attach it as a light source on the back of your Foldscope. With the LED attached, you can lay your Foldscope on a flat surface for easier viewing and recording.
Projection is great for group viewing and sketching. Best results require projecting onto a white flat surface in a dark room.
Note: Projection requires a strong light source. A phone’s flashlight works well! You can try using other flashlight using the same attachment method outlined here.
Attach a coupler over the phone’s flashlight. (Make sure to place the coupler with the silver magnet side UP, facing you.)
Once the coupler is attached, bring your phone’s flashlight up to the aperture on the back/yellow side of the Foldscope.
Turn on the phone’s flashlight, and aim the front of the Foldscope at the smooth white surface. You should see an image of your sample projected on the surface!
From here, you can pan and focus your sample as usual until this image is clear. To zoom in, move your phone and Foldscope further away from the surface and watch the image expand. If it doesn’t appear bright enough, try moving your phone and Foldscope closer to the surface.
DO NOT look into the Foldscope’s lens when your phone flashlight is attached! This light is much brighter than our LED module and may harm your eyes if you try to view it directly through the lens.
To move, press and move your thumbs in the same direction.
This motion will move the lens, allowing you to explore different areas of your sample.
You should see the objects in your field of view move as you move your thumbs.
To focus, slide focus ramp left/right with your index finger.
This motion will move the lens further/closer to your sample, allowing you to adjust focus.
You should see the objects in your field of view shift from blurry to crisp as you slide the ramp.
To use your Foldscope, you need to insert a sample so that there’s something to see! It’s easiest to view samples mounted on either a glass or paper slide. To learn more about collecting and preparing samples, see the sample preparation section. Foldscopes can also be used with prepared slides, such as the ones sold in these kits.
To insert a sample, flip your Foldscope to the yellow side and open the back flap.
Hold your slide so that the sample is facing down, towards the lens.
Hold the slide vertically in the middle of the Foldscope and insert each end of the slide into the top and bottom slots on the slide stage. The slide ends should be tucked under the folded flap (see red arrows in the image in this section).
If you are using a paper slide, you may need a spacer slide to adjust for correct focus. Hold your slide with the side that should be closest to the lens facing down, then place a blank paper slide on top of it. Insert these two slides stacked together into the slide stage.
Before viewing any sample, you should first align it with the lens. With the back flap open, shift the slide stage until the portion of the slide containing your sample is directly over the back of the lens. Although you can still pan around to view different areas while viewing, it helps to begin in a region of interest.
A good Foldscope sample is anything you’re curious about! Although some things are easier to image than others, it’s possible to mount just about anything with a few useful tricks.
Because Foldscope is a transmissive light microscope, it’s important that your sample is translucent enough to allow light to pass through.
Examples of common items that might be interesting to examine in your Foldscope include hair, fabric/fibers, mold, fruit skin, leaves, flower petals, printed paper, insects, algae/moss, pond scum, pollen, feathers.
Finding a sample:
The most important first step is finding a good source of samples. For pond samples, for instance, the grosser and gunkier, the better! Standing water is better than running water, and somewhere with more vegetation is better than somewhere clear and open. Look for ponds, marshes, and puddles with lots of algae and decaying plant matter.
Collecting a sample:
Using an Eppendorf tube, or any small bottle or jar, scrape along a particularly gunky section of your water source. Once it’s full, hold it still and take a good look-- if your water has lots of life, you may be able to see microorganisms swimming around after the debris settles. You can also grab pieces of algae or seaweed with a pair of tweezers.
Preparing your sample:
Especially if your sample is particularly dense, it can be helpful to spread it out in a tray before selecting a droplet to place on your slide. If you dump your collection tube into the upturned lid of your well plate or another small container with a smooth, clear base, and then place it over a white piece of paper, it may be easier to find specimens of interest. You can also use tweezers to break up any plant material.
Mount your sample onto a slide, and insert it into your Foldscope
Viewing your sample:
After your sample is securely mounted, it can be viewed as any other slide: make sure that your coverslip is closer to the lens, insert it in the slide stage, align your point of interest with the center of the lens, face a light source, and view with either your eye or your phone.
The easiest way to get a good image is to mount your sample on a slide. Slides provide a stiff base for the sample, stabilizing the focus. They also insert snugly into the Foldscope’s slide stage, which allows for easy panning. Foldscope is compatible with standard glass microscope slides, or you can use the paper slides we provide in each kit. If you run out, you can always make your own paper slides using a similar cardstock material-- cereal boxes work great! We also sell packs of extra paper slides.
To mount a sample on a paper slide, first place a clear sticker (included in every kit, extras available here) or a piece of translucent tape over the window, then place your sample on the sticky side of the tape. If your sample is something that’s already relatively flat and attaches securely to the tape, then there’s no need to cover it-- you’ll get a better image by viewing your sample directly. This technique works well with samples such as paper, leaves, flower petals, feathers, and hair or other fibers. If you have a more fragile sample such as mold or pollen, you can cover it with a second clear sticker, sandwiching the sample in the middle of the window.
To mount a sample on a glass slide, simply place your sample on the slide and cover it with a clear cover sticker, a piece of transparent tape, or a glass coverslip.
If you want to view something without using a slide, such as a leaf or a piece of paper, you can try clipping it directly between the slide stage and back flap. You may need to insert a blank paper slide in the slide stage to allow for proper focusing.
Try viewing a leaf that is still attached to a tree or other plant! This would be very difficult to do with a conventional microscope, but Foldscope’s portability means that you can observe living systems in action.
If your sample is particularly thick or large, our accessory ring stickers can be used as a spacer. This is especially important for samples you don’t want to squish, such as insects or other fragile specimens whose 3D structure you want to preserve. You can use either the white ring stickers included in every kit, in which case you’ll need to use a clear sticker or glass coverslip on top, or you can use our new black ring stickers, which are specially designed for sample mounting. These ring stickers come in varying thicknesses suitable for a range of samples and include their own transparent plastic coverslip, with no adhesive layer to distort imaging.
If you’re using a paper slide, first stick a clear sticker or a piece of transparent tape over one of the windows, then stick a ring sticker in the center of that window on the sticky side of your tape. If you’re using a glass slide, just stick the ring sticker in the middle of your slide. Remove the ring sticker’s top cover, then place your sample in the center of the ring sticker, and seal it with a cover slip as usual. The ring sticker acts as a spacer that prevents the magnet around the lens from crushing your sample. If one ring sticker is not sufficient, you can stack multiple ring stickers on top of each other until it’s high enough for your sample.
Watch a video tutorialof how to create wet mount slides for water samples. Live water samples are one of the coolest things you can look at under the Foldscope! But they also can be a bit tricky to prepare. Creating these slides can take some patience and practice, so don’t be frustrated if it takes you a few tries to get it right.
Wet samples are much easier to mount on glass slides, but it is also possible to use paper slides.
If you’re using a paper slide, first stick a clear cover sticker or a piece of transparent tape over one of the windows, then stick a ring sticker in the center of that window on the sticky side of your tape.
If you’re using a glass slide, just stick the ring sticker in the middle of your slide.
Either way, the ring sticker creates a well that holds in the water and provides a spacer so the organisms don’t get squished. Use a dropper to select a small drop of water.
If your organisms are visible to the naked eye, it’s worth trying to chase them down!
You can also use tweezers to take a pinch of algae or other plant matter from your sample and then place it in the center of the ring-- microorganisms are often nestled in vegetation. It’s important not to take too much plant matter, and to spread it out with your tweezers in the ring; thick clumps will be very dark, dense, and hard to see through.
If you can see the water surface bulging above the top of the ring sticker, you need to remove some water so that your cover slip will lay flat without too much spilling. You can do this by sucking some of the liquid back up with the dropper, by using the dropper to knock some water out across the ring sticker and drying the excess with a paper towel, or by dipping the corner of a paper towel directly into your well of water and pulling it away immediately as soon as some liquid is absorbed.
Once the water is at an appropriate level, seal your well by placing a glass cover slip, a clear cover sticker, or a piece of transparent tape over the ring sticker. To minimize bubbles, start placing your cover from one side of the ring and slowly tilt it down until it is flat across the sample.
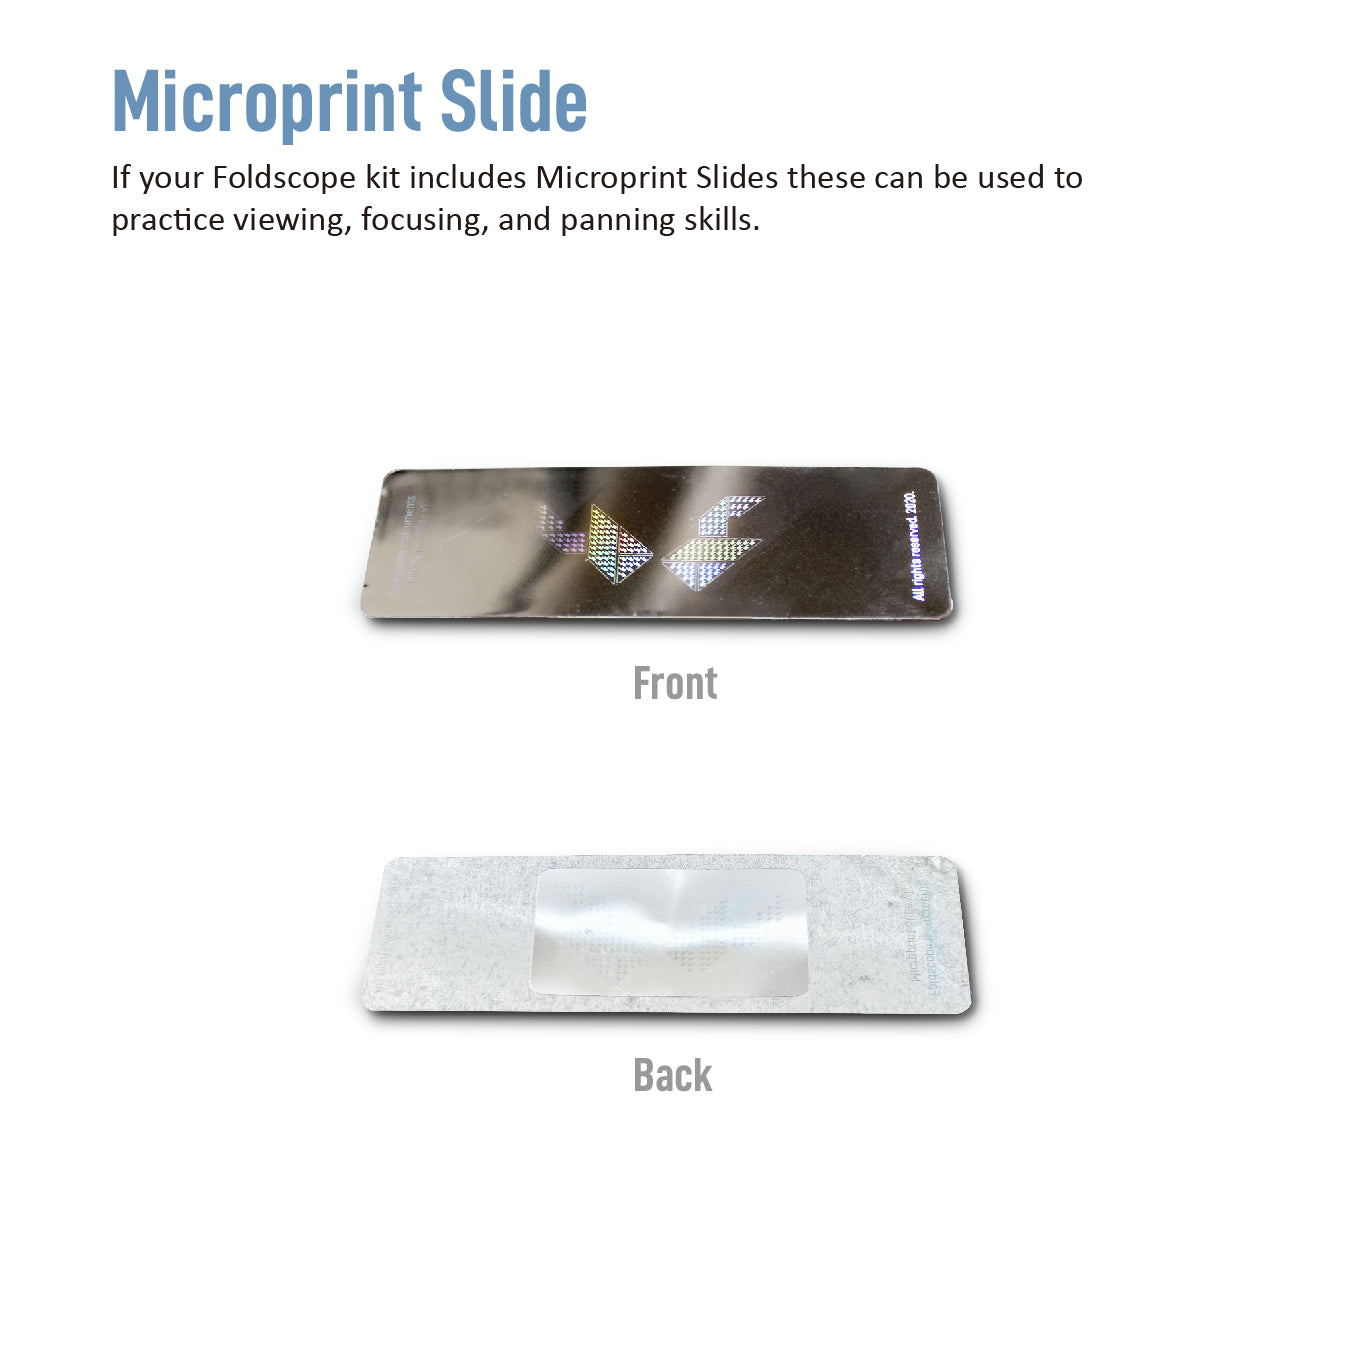
If your Foldscope kit includes Microprint Slides these can be used to practice viewing, focusing, and panning skills. NOTE: Due to the printing technology used, the actual physical sample may have some printing defects visible through your Foldscope, and the colors may not be easy to distinguish from each other. These imperfections are completely normal and to be expected.
The front side of the microprint slide is colorful, metallic, and smooth.
The back side of the microprint slide is appears light grey and uneven in texture.
Insert the microprint slide into the Foldscope with the frontside facing the lens.
Once inserted, the back side of the microprint slide should be visible facing outward.
The microprint slide has 2 large Foldscope logos composed of many microscopic repeating Foldscope logos. The outline of each monochromatic section of the larger logos is also comprised of the following repeating microtext: “Foldscope Instruments: Magnifying Curiosity Worldwide!”
You should be able to pan around to view the many repeated microscopic logos and the microtext.
Scavenger Hunt Challenge: There are two irregular elements (one logo and one word) that are larger and a different color than their surrounding elements. Challenge yourself to find the irregular elements!
This FAQ section covers how to use Foldscope. For other questions, visit our FAQ page or Company page.
Correct side
Are you looking into the Foldscope correctly? Holding the sides with your thumbs, bring the blue side up to your face and look into the lens with one eye. Your eye should be quite close to the lens aperture, which is the small hole in the middle of the oval lens.
Assembly check
The first step is to make sure your Foldscope is assembled properly. Check your work by following along with our assembly video.
Slide insertion
Did you insert a slide? If you didn’t put in something to look at, there won’t be anything to see. More information on slide preparation and insertion.
Sample aligned with lens
Is your sample aligned with the lens? If your sample is very small, you might not see it because it’s outside your Foldscope’s field of view. Flip over your Foldscope, open the back flap, and see where your sample is on the slide. Shift the slide stage so that your sample is directly over the back of the lens, and then close the back flap and try looking again.
Light source
Are you facing a light source? You won’t be able to see anything if your sample isn’t properly illuminated. To view a sample clearly, there must be light coming in through the aperture on the back flap. Make sure that you are facing something bright, such as the sky, a lamp, or a window. You can also use our LED module for more stable lighting.
Sample quality
If you inserted a large sample that’s over the lens and are facing a light source but still can’t see anything clearly, your sample might be too thick. Try slicing it, squishing it, or spreading it out so that it is translucent enough to let light through, or try using a brighter light source.
Focus
Almost every time you view a sample in a microscope, it will be blurry when you first look at it. This is because you need to bring it into focus by moving the sample closer to or further from the lens. With Foldscope, you do this by sliding the focus ramp side to side. If your image is blurry, first try adjusting the focus and see if that makes it clear.
Sample towards the lens
If you’ve tried the full range of focus and your image is still blurry, make sure your slide is inserted so that the sample is as close as possible to the lens. In glass slides, this means that the side with the coverslip should be facing the lens, and the smooth glass side should be facing out. In paper slides, if you’re using only one piece of plastic tape, the sticky side with your sample should be facing the lens and the smooth tape side should be facing out. If your sample is sandwiched between two pieces of tape, however, there’s nothing special about either side so direction doesn’t matter.
Lens
Make sure that your lens is clean and properly attached. Before viewing your first sample, we recommend that you clean your lens by rubbing each side of the glass ball for 10 seconds with the pointed cotton swab we provide. Try to avoid touching the glass surface of the lens with your fingertips, as our skin has oil that will smudge it. Check that you did not accidentally stack two lenses, or attach an extra coupler-- this will make it impossible to focus.
Lighting
A good light source can make a huge difference in the quality of your image. Make sure that you are pointing your Foldscope towards a bright, evenly illuminated area, such as the sky, a well-lit wall, or a window. If your image seems unclear, try shifting your angle towards the light or use a different light source. Although any bright light source works, the most stable and reliable way to illuminate your Foldscope sample is to use our LED module.
Certain phones have magnetic components that oscillate when they come too close to the magnets in Foldscope’s lens and couplers, making it impossible for the camera to capture a stable image. Unfortunately, that means that these phones are incompatible with the current version of Foldscope. We are working to resolve this issue in the next generation of products.
Microscopes have a limited field of view-- the area that you see has a limited size. This means that you can only see the part of the sample within that area.
Congratulations! Go out and explore-- we encourage you to be curious and investigate the world around you, whatever that might be. Check out our community website microcosmos.foldscope.com to get inspiration from the discoveries of other users around the world.
If you need extra help getting your Foldscope to work or want someone to show you more advanced techniques, send us an email at info@foldscope.com
Foldscope has a magnification of 140x-- check out more information on the key metrics section. When multiplied with the zoom of a cell phone camera, you can achieve a total magnification of over 1000x.
Conventional microscopes typically have better optical performance and greater stability and control. Conventional microscopes are also often expensive. Foldscope is smaller, lighter, less expensive, and more durable. This portability makes it ideal for field research, hiking trips, and other rugged scenarios. It is also ideal for under-resourced settings where people would not otherwise have access to a microscope. Although the low price is also an appeal for classroom use, Foldscope’s main benefit is that it allows every student to have their own microscope, providing more hands-on microscopy time and opening new possibilities for independent research projects as students can take the Foldscopes home with them. Foldscope is not trying to replace conventional light microscopes. We still believe that it is important for students to learn traditional lab microscopy techniques when possible.
Foldscope has been used for a wide variety of projects all over the world. Check out the research page for a list of papers that reference Foldscope, or explore our Microcosmos community site to see what people are discovering every day.
Building a Foldscope for the first time typically takes around 20 minutes, but once you know how it can easily be assembled in less than 10 minutes. Your Foldscope stays assembled after you build it, so you only have to put it together once. Follow along with our assembly tutorial video
We recommend Foldscope for explorers ages 8 and up.
Just about anything you can put on a slide! More information on sample collection can be found in the Samples & Slides section.
Foldscope works best with samples that are mounted on slides, but this includes more than you might think. Paper slides are included in every kit as an alternative to glass. Check out the Samples & Slides for more information on what you can view and how to view it.
Additional questions should be directed toinfo@foldscope.com.